Oracle Eloqua Salesforce Integration App is here!!
You may know that Oracle is able to integrate between CRM systems and Eloqua. Up till now, the Integration between Salesforce.com and Oracle Eloqua has been configured using the native integration area in Eloqua and Program Builder. Oracle has now created a new Salesforce.com Integration App that provides a faster speed-to-lead and a simpler configuration user Interface.
If you currently have an Integration between Oracle Eloqua and Salesforce CRM using the native integration it is important to know that Oracle will no longer support it as of February 1, 2021. It is recommended that customers who are currently using the native integration between Oracle Eloqua and Salesforce CRM start preparing now for the transition to the new app. The app is available in the Oracle Cloud Marketplace free of charge. You can read more about the transition in the Oracle Product notice. (You will need an Oracle Support Account to view the notice). Keep in mind if you are migrating from the native to the new integration app, you can run the two integrations side-by-side.
To give you a little more time in your day and less frustration while installing this new app, I want to offer a few morsels of information we have learned along the way because as with all new things, there can be a learning curve and this app is no different.
Whether you want to migrate an existing Integration or are starting from scratch the article “Integration Best Practices” is worth a read. If you already have an existing integration, it’s a great time for some spring cleaning and re-evaluation to make sure you need what you have and have what you need.
Some benefits of the new Salesforce.com integration app include:
- Outbound calls from Eloqua to CRM run on the Program Canvas instead of Program Builder. This greatly improves your speed-to-lead.
- The Salesforce.com Integration app uses the new Eloqua User Interface unlike the Native integration which uses the older E9 interface.
There are a couple of nomenclature changes:
| Salesforce.com Integration App | Native Integration |
| Imports | Auto-syncs |
| Actions | Internal Events/External Calls |
Getting Started
Now, let’s get on with some steps you will need to take to get started!
First, make sure these preliminary tasks are completed. If you have a native integration currently running you may have some of these completed already.
- Create a Salesforce Integration user (below are recommendations)
- First Name – Eloqua
- Last Name – Marketing
- Alias – Eloqua
- Email – your email address
- Username – [email protected]
- It is recommended that the password for this user does not expire
- Add Oracle Eloqua to the list of trusted servers in Salesforce:
- Add the Oracle Eloqua IP addresses to the Salesforce list of approved or trusted servers (whitelist). Note: When logged in to Eloqua, the Pod number appears in the URL (ie: p01, p02 etc.)
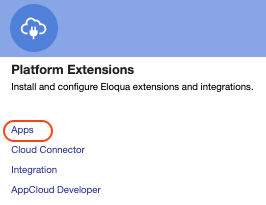
Now, let’s get the new Salesforce.com Integration app installed.

-
- Select the “Salesforce.com Integration” App
- Click on the Configure icon found in the top right of your screen to access the configuration settings
- Next you will need to create a connected app in Salesforce. This part can be tricky, but we will try to help here with some details.
- The screenshot below shows exactly how the Salesforce Connected app needs to be configured to allow Eloqua to connect successfully.
- Selected OAuth Scopes (Set by SFDC Admin)
- All 3 of the scopes need to be selected
- Access and manage your data (api)
- Full access (full)
- Perform requests on your behalf at any time (refresh_token, offline_access)
- Callback URL
- This can be copied from the SFDC Integration app’s configuration area within Eloqua.
- All 3 of the scopes need to be selected
- You will need to capture the following values to use when creating your Connection in the app
-
-
- Consumer key: Displayed in the Salesforce connected app after creation.
- Consumer secret: Displayed in the Salesforce connected app
-
Tips, Tricks and Gotcha’s
Now that the app is installed and you have your Connected App created in Salesforce, you are ready to start building your integration or can migrate your existing native Salesforce CRM integration. To assist you on your journey, here are a few tips, tricks, and gotchas that we have learned in the various integrations that we have configured.
Timing of the Change and Preparation
The Native and the new Salesforce.com Integration app can run side-by-side until you have the new one complete.
Make sure you have mapped the SFDC ID fields, or you won’t be able to save your connection. These inputs are located in the “Connections” area below the “Connected App” section.
18-character IDs
If you have an existing Integration using the 18-character ID then you have nothing to worry about. However, if you’re currently set up with 15-character IDs you will need to update those to 18-character IDs in Salesforce and in Eloqua. 15-character IDs will fail to match and your integration will not work. To make the switch, your SFDC admin will need to change the IDs on all relevant objects to 18 characters. Once this is done, you’ll need them to export all impacted records and provide you a spreadsheet with email address and the new ID. Import this list into Eloqua to overwrite all of the old 15-character ID with the new 18 character versions.
Options Menu
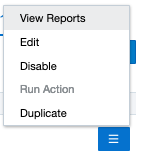
Here are some of the menu options available
- View Reporting
- Navigate to “Actions” or “Imports”
- Click on the connection’s menu icon
- Click on “View Reports.
- Click on the connection’s menu icon
- Navigate to “Actions” or “Imports”
- Edit
- Edit your “Action” or “Import”
- Disable
- Disable your “Action” or “Import”
- Run Action
- Manually Run your “Action”
- NOTE: The Action must be Enabled to Run
- Manually Run your “Action”
- Duplicate
- Use to Duplicate an “Action” or “Import”
Field Mapping
- Field options for mapping will only present matching data types
- Don’t worry if you don’t see all expected fields for an asset
- Advanced Mode
- Allows you to enter multiple objects to be sent to a single Salesforce field.
- You also have the option to add static text as needed
- Allows you to enter multiple objects to be sent to a single Salesforce field.
Imports
- Import “Post Processing” (Limit of ten post processing actions)
- You have several “Post Processing” options
- Add or Remove from Shared List
- Subscribe or Unsubscribe to Email group
- Send to a Program is an option from the Program Canvas by using the “com Feeder” step.
- You have several “Post Processing” options
Filter Details
- The filters in your import calls use something called Salesforce Object Query Language (SOQL). Once you get use to this, it’s not so scary.
- Here are a few simple examples:
- Get Leads:
- (RecordTypeId = ‘012R000000059nl’ or RecordTypeId = ‘012R00000005ANP’) and IsConverted = FALSE and Email like ‘%@%’
- Get Leads with a few additional values:
- (RecordTypeId = ‘012R000000059nl’ or RecordTypeId = ‘012R00000005ANP’) and (Country = ‘Canada’ or Country = ‘Czech Republic’ or Country = ‘Hungary’ or Country = ‘Poland’ or Country = ‘Slovakia’) and IsConverted = FALSE and Email like ‘%@%’
- Get Contacts:
- AccountID !=’001o000000RLfQk’ and RecordTypeID !=’012o0000000xrxf’ and (MailingCountry = ‘Canada’ or MailingCountry = ‘Czech Republic’ or MailingCountry = ‘Hungary’ or MailingCountry = ‘Poland’ or MailingCountry = ‘Slovakia’) and Email like ‘%@%’
- Get Leads Example with Record Type = Null value:
- Email like ‘%@%’ and IsConverted= FALSE and Marketing_Email_Opt_Out__c != TRUE and (RecordTypeId = null or RecordTypeId = ‘01270000000E9auAAC’)
- You can also do cross-object filtering. If you need to filter your contact import so that no one with a certain Account Type would come in.
- Type = ‘Internal’ and Contact.Email like ‘%@%’
- “Object Name dot Field Name” to specify a field from a different object
- Comparison Operators
- Comparison operators, such as =, !=, <, >, LIKE, and IN, can be used in the field expression of the WHEREclause in a SELECTstatement in a SOQL query. You can also create more complex queries with semi-joins and anti-joins.
- Type = ‘Internal’ and Contact.Email like ‘%@%’
- Get Leads:
The following table lists the comparison Operator values that are used in field Expression syntax. Comparisons on strings are case-sensitive for unique case-sensitive fields and case-insensitive for all other fields. (See link below for table)
Migrate your Native Integration
If you are currently using the native integration with Salesforce, you can get started with the Migration tool provided. Make sure to review the Salesforce.com app tips, tricks and gotchas first.
You will need following prerequisites in place before getting stated:
- An existing native Salesforce.com Integration with Oracle Eloqua
- At least one connection configured in your Salesforce.com instance.
Here are some things to keep in mind when Migrating your integration:
- If an asset in your native integration does not have a corresponding asset in your Salesforce.com Integration app account, it cannot be selected on the “Migrate Assets” page.
- Keep in mind that it is NOT possible to stop a migration once it has started. Even if you click the Cancel button, the migration continues in the background.
- We typically do this in two or more batches depending on how many calls you need to migrate. Not required, it’s just our preference.
- After the migration has completed it will let you know if it has success or any failures.
- For Failed calls, we have found that rerunning them does not usually work, if it fails, it seems to fail every time.
- For those that are successful you need to go in and review the mappings as some fields may have been missed and have blanks or if they used custom values (e.g. text or multiple fields)
- You can edit the call and update it manually using the advanced settings.
- In some cases, you may need to manually recreate the entire call, but it’s been rare in our experience.
- If you rerun the migration for successfully migrated assets, they will be duplicated and not overwritten.
Start your Migration
Navigate to your Salesforce.com Integration App.
Tip: Wait for your screen to refresh fully on the “Status and Reporting” screen before you attempt to click on any other areas on the screen.
- Click on “Connections” on the left side of your screen
- Click on the connection’s menu icon and select “Migrate Native Assets”
- When you click on “Migrate Native Assets” they system will display the native assets available for the connection.
- Select the assets you want to migrate
- Click “Migrate”
Once the migration is complete, the migration status for each asset will display.
Indicates that the migration of the asset was successful.
Indicates that some records could not be migrated because of a mismatch with the native integration. These records can be manually corrected.
Indicates that the migration of one or more assets failed because the connection to the server could not be made at this time. We recommend rebuilding any failed calls manually.
Whether you are staring your Integration from scratch or migrating an existing Integration, we are here to help.
—————
The Oracle Eloqua Help Center is a great resource for some detail configuration steps.
- Details on creating the connected app can be found in the Oracle Eloqua Help Center.
- Integration App detailed steps can be found on the Oracle Eloqua Help Center
- Oracle has provided some helpful FAQs on the Eloqua Help Center
Thank you for subscribing!


