FEDTalk: Validating conditionally displayed form fields in Eloqua
Welcome to this latest edition of FEDTalk! In today’s post, I’m going to follow up on something that I talked about briefly in a previous article, and that’s setting validation rules on conditionally shown/hidden form fields in Eloqua.
Previously, on FEDTalk
To recap, when form fields in Eloqua are conditionally shown or hidden via JavaScript, the validation rules applied to that field do not change on their own. The example I used previously was that of a “state or province” field being shown if the user selects “United States” or “Canada” in a “country” field and hiding that field if the user selects something else. We would probably want the “state or province” field to be required, but the application of that validation rule needs to be conditional along with the fields’ visibility. While that functionality is not built into Eloqua, we can easily add it through… wait for it… more JavaScript!
How validation rules work
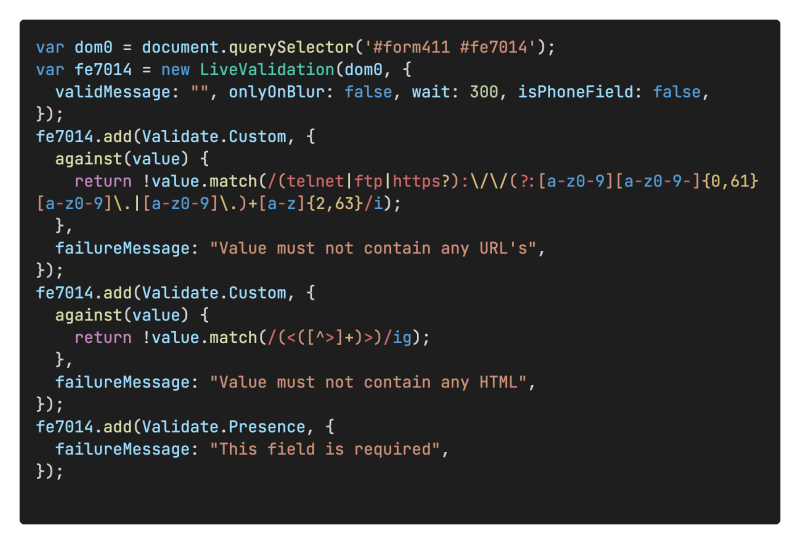
First, a little background into how Eloqua’s form field validations work. Oracle uses a customized version of the LiveValidation JavaScript library to handle field validations in the web browser (aka, “the front-end”); the Form Editor builds out the scripting needed based on the validation settings applied to each individual field. If you’ve worked with raw Eloqua form code before, you’ve seen it; it looks something like this:
For the field in the above example, the following validation rules were selected in the Eloqua Form Editor:
- “Must not contain any URL” → The first “Validate.Custom” shown above
- “Must not contain any HTML” → The second “Validate.Custom” shown above
- “This field is required”→ The “Validate.Presence” shown above
The last one is probably the most-used validation rule on Eloqua forms, because it makes it so that the user can’t submit the form until they provide a response. If it’s applied to an empty field that’s hidden from the user, the user won’t be able to submit the form, get frustrated, and potentially light up your feedback inbox with unpleasant messages.
Side note: Validation rules cannot be applied to the “hidden” field type in Eloqua but can be applied to fields that are hidden from the user using CSS; this is a very important distinction to keep in mind.
Now, let’s get further into the weeds; we’ve seen how the validation rules are set, now let’s talk about how they’re stored.
Where validation rules are stored
Warning: CodeSpeak ahead.
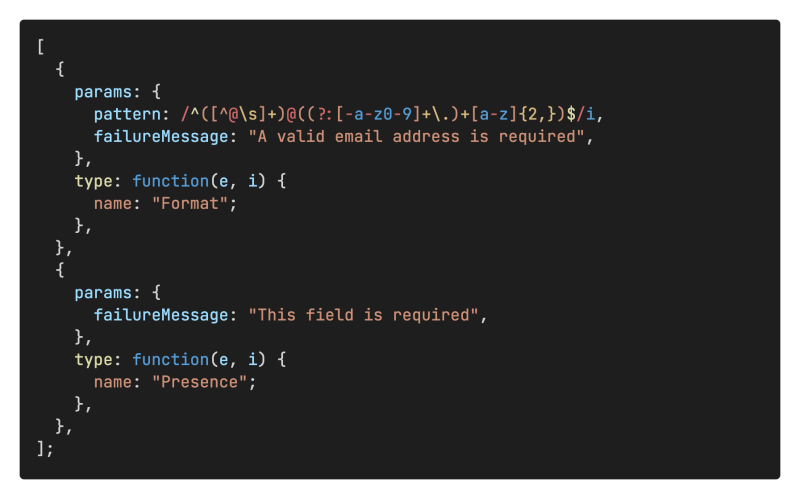
When the LiveValidation library sets up validation rules on form fields in Eloqua, it stores them as an array of JavaScript objects in a property (“validations”) that is attached to a variable that references the field. That variable is in turn named using the field’s ID value. In the example above, you can see that “fe7014” is being used as the variable name, which is referencing the field with the same ID.
In the following example, the “Must contain a valid email” (i.e., “Format”) and “This field is required” (i.e., “Presence”) rules are set:
Why is this important, Jeff?
It’s important because now that we know how they’re stored, we can start manipulating them! Let’s start with an easy one.
Adding a validation to a field
This is straightforward, actually. All we need to do is:
- Check to see if the field already has the desired validation rule applied to it; and
- If not, add it
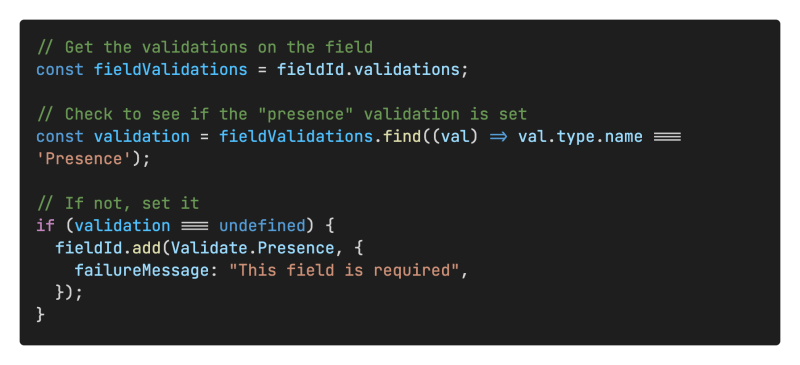
Let’s see how that translates into actual code; the following example will check to see if the field is set as “required” and add that rule if it isn’t.
First, let’s get the validation rules applied to a field by accessing the JSON in the field’s validations property; we’re using “fieldId” here as a generic term, in actual usage, it would be replaced with the actual field ID value:
Next, we’ll check to see if the rule is already applied to the field by checking the JSON array for a type named “presence”:
If validation is undefined because the rule isn’t applied, we can go ahead and add it, using the syntax we’ve already seen in the Eloqua-generated script:
Put it all together, and you get the following block of code:
You can then add this to the portion of your show/hide script that displays the field, and you’re all set!
Removing a validation from a field
If we need to dynamically add a validation rule to a field, we’ll likely need to remove it as well. We can accomplish this by looping backwards through the applied rules and looking for the specific one we would like to remove. Why backwards? Because we’re using the splice method to remove the rule from the array and looping backwards allows us to use that method without fouling up the index values of any other items that might also be removed.
The code looks like this; again, in this example, we’re removing the “This field is required/Presence” rule:
You can slot this bit into the portion of your script that hides the field, and it’ll remove that pesky submission-blocking validation rule once the field has been banished from view.
Easy, right?
One final note
One important thing to keep in mind is that if you have a form field that is going to be conditionally shown or hidden, do not apply any potentially blocking validation rules to it in the Eloqua Form Editor. If you do, then the rules will still be applied to the form in the backend, which could result in the dreaded Form Submission Error page being displayed to your now-frustrated user. Leave them off the form in Eloqua and handle the validations within the browser only. Hint: If you don’t want to mess with writing the code yourself, apply the validations you want to your fields, save the form, export the HTML, and grab the code from there. Then, go back into the Form Editor, and turn off any potentially blocking validation rules, and save again. Then take the code that you copied out of Eloqua, grab the validation portion, and paste it into your web page.
What are the blocking rules, you might ask? Well all of them are technically blocking; that’s what they’re there for. However, there are several available through Eloqua which can catch you off-guard by preventing a form submission even though they’re not set as being “required”:
- “This Field is Required” → No explanation needed here, really. Again, this is a “Presence” rule in LiveValidation.
- “Must contain a valid email” → This one is sneaky. Even if the field isn’t “required”, it will block submission until a valid email address is entered. This is shown as a “Format” rule in LiveValidation.
- “Must have a value within the numeric range” → This is shown as a “Numericality” rule in LiveValidation and is only available for fields set to a Data Type of “Numeric”. This means that a field must have a numeric value entered between the specified range, and will not allow submission if it doesn’t have one.
- “Must contain a valid date format” → This is another “Format” rule in LiveValidation and pops up if the field’s Data Type is set to “Date”, and the data does not conform to either the MM/DD/YY or MM/DD/YYYY formats by default. Again, it requires a value, in the correct format, before it will allow submission.
- “Must contain a valid number of characters” → If the minimum number of characters is set to anything other than zero, then this can also be a sneaky blocker. Likewise, if this is applied to a field like one for lead sources and the upper limit isn’t checked (man, lead source codes can get long), it can lead to a lot of frustration in testing. This is shown as a “Length” rule in LiveValidation.
Now, you should be able to dynamically add and remove any validation rules you like, on any form field you like, whenever you need to!
Still have questions?
If you need assistance getting your forms working exactly how you want them, Relationship One’s Production Services team is ready to help! Give us a shout!


