Best Practices for Building Forms and Processing Rules | Part 2 of 2
Welcome back to this two-part series focusing on creating optimal forms in Eloqua! In our first post, we reviewed how to create forms within the Oracle Eloqua platforms. In the second part of the series, we will focus on creating processing steps for your forms. Processing steps are the brains of your form. They direct the actions that happen after someone hits “submit.” Let’s dive in!
Now that you have your form design completed, it’s time to set up your form processing steps. These allow you to configure what you would like to happen after a contact submits a form (such as updating a contact record or custom data object), and what actions to take as a result of the submission (for example, sending the submitter an email or adding them to a campaign).
Here are just a few of the most common examples of form processing steps:
• Create a new contact record OR refresh the data in an existing record with new or updated information
• Redirect the contact to a web or confirmation page
• Add the contact to a shared list for better segmentation
• Add the contact to a nurture campaign
• Send the contact an email
Let’s get started!
Click on the Processing button in the top right corner of the page; this will take you to the Form Processing page.
Before you begin, take some time to plan what you want to happen after the contact submits the form. You should have all the assets created prior to setting up these steps (like campaigns, shared lists, emails, etc.)
1. At the bottom of the page on the left side, click on the symbol to configure your key mapping. Most organizations use the email address as the primary contact identifier. If your contact identifier is another field, choose that from the drop-down.
2. To select your processing steps, click on the + sign at the top of the left navigation. Here you’ll find a variety of steps to choose from. Click and drag or double-click the step you’d like to configure, and it will populate in the processing steps pane.
*Note: Add the steps in the order that you feel they should be performed as you cannot change the order of the steps once they’ve been added. There are some form processing steps that must be performed before others and Oracle Eloqua will reorder those steps accordingly. To view the order that Oracle Eloqua processes the steps, reload the form after you’ve completed adding all the steps.
Updating Form Data
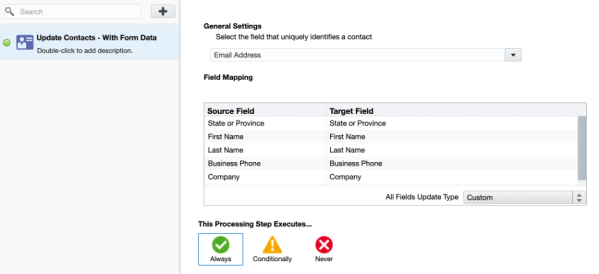
- Select whether you are updating the contact record, account, or custom data object and choose one of the following options:
- Update Contacts – With Form Data
- Update Account – With Form Data
- Update Custom Data Object – With Form Data
- In the right pane, configure the step:
- General Settings: typically email address is used (as was selected in the @ section in step 1). If your contact identifier is another field, choose that from the drop-down.
- Field Mapping: verify that the Source field is mapped to the correct Target field. To change a mapping, double-click the form field in the list and update to the correct field.
- All Fields Update Type: choose when you want to update the field from the drop-down list. If a specific field should be updated differently than the rest, you can double-click the field and configure the update type for that specific field.
- This Processing Step Executes: this will default to Always. This can be set to Conditionally if applicable.
- Save
Updating Custom Values
- Select whether you are updating the contact record, account, or custom data object and choose one of the following options:
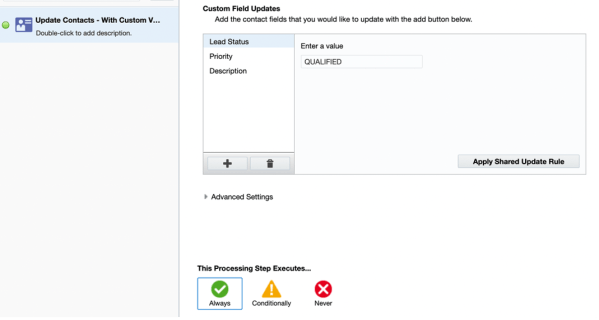
- Update Contacts – With Custom Values
- Update Account – With Custom Values
- Update Custom Data Object – With Custom Values
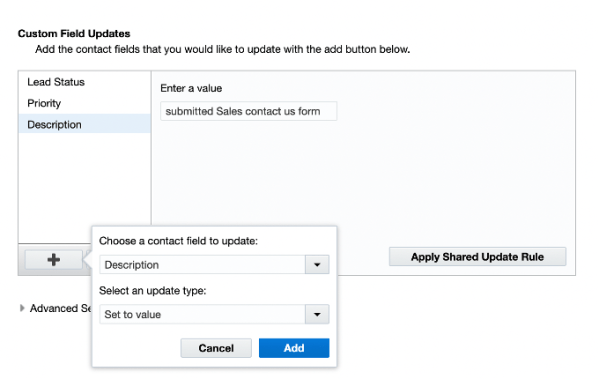
- In the right pane, configure the Custom Field Updates:
- Click the + sign and choose the contact field to update and how you want to update it.
- Click Add and configure the settings for the update.
- Click the + sign and choose the contact field to update and how you want to update it.
- This Processing Step Executes: this will default to Always. This can be set to Conditionally if applicable.
- Save
Choose the Actions
- We’ll use the Send Submitter an Email step as an example. You may also add a description by double-clicking on the step.
*Tip: autoresponders are excellent opportunities to further engage form submitters and traditionally have higher open and click-through rates!
- General Settings: keep the default settings of Always send the same email and use the drop-down to choose the email you would like to send.
- Allow Resending: this will default to No. You can change this to Yes if your use case calls for this.
- This Processing Step Executes: allows you to determine if the email should be sent always, never, or if it’s conditional, based on if certain conditions are met.
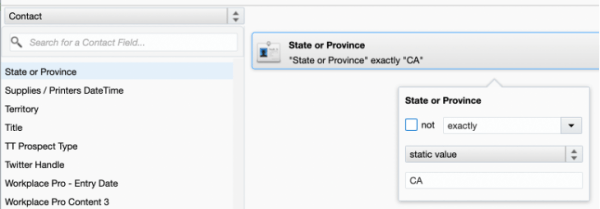
- For conditional steps, click on the Conditionally icon to open the Conditions Editor. Here you can click on the type of information you want to evaluate.
- Perhaps you only want the email to be sent to those contacts who reside in a specific state. You can create that condition here.
- For conditional steps, click on the Conditionally icon to open the Conditions Editor. Here you can click on the type of information you want to evaluate.
*Note: you can choose multiple conditions per step, however all conditions must be met to run the processing step.
- Continue to add your processing steps and add conditions as needed.
*Note: If you create a step and then decide to disable or delete that step, you can right click on the step to make that choice, or you can click on the double arrow button at the bottom next to the @ sign.
Your form is now complete and ready for use! Please keep in mind that forms can be a powerful source of information about visitors, potential customers, and existing customers. Therefore, it is important to give some thought to the design and use of the forms in your campaigns. By investing some time in designing and using forms correctly, you can maximize the amount of data received to populate your marketing database.
I hope this has been helpful and that you enjoy creating and using forms in Oracle Eloqua.
If you could use some assistance getting started with forms, or any of the other cool features in Oracle Eloqua, Relationship One is always here to help.
Thank you for subscribing!


