3 Tips and Tricks for Transactional Email Formatting
If your organization is interested in delivering real-time messages for transactional events to your customers, Relationship One’s Transactional Email App is the way to go. If you want to learn more about transactional email messaging, check out our previous blog post that walks you through the basics.
Now if you are currently using the Relationship One Transactional Email app, you know that an email is more than just plain text. Sometimes, you want to send nicely branded and formatted emails to your customers. Appearances do matter and they also impact your email performance. This is why we are sharing some tips and tricks to help you take your transactional email formatting to the next level.
In this blog, we will cover the following ways to use the Transactional Email app:
- How to use Dynamic Links
- Customizing these links with your branding
- Managing different types of links in your copy
- Creating button CTAs
- How to build your entire Email within the Transactional Email app with special formatting for Header, Body, and Lists.
- How to copy HTML code from one email to another
Dynamic links overview
What are they?
The Transactional Email app allows you to send customized URLs via your JSON code. This is a great benefit if you want to share a personalized log-in or a link associated with the specific transaction. The Transactional Email app allows you to build these dynamic links and make them available in your email configuration.
Examples for using Dynamic Links:
- Abandoned cart – you can send a customer their personalized cart link to complete their transaction.
- Notification – you can send an internal email to a sales rep for a new Lead/Project assigned. Or, you can send a support request confirmation email with details on the customer’s support ticket.
Creating a dynamic link:
First, you must create the link as a “dynamic link” in your event. There are two types of dynamic content URLs you can set up:
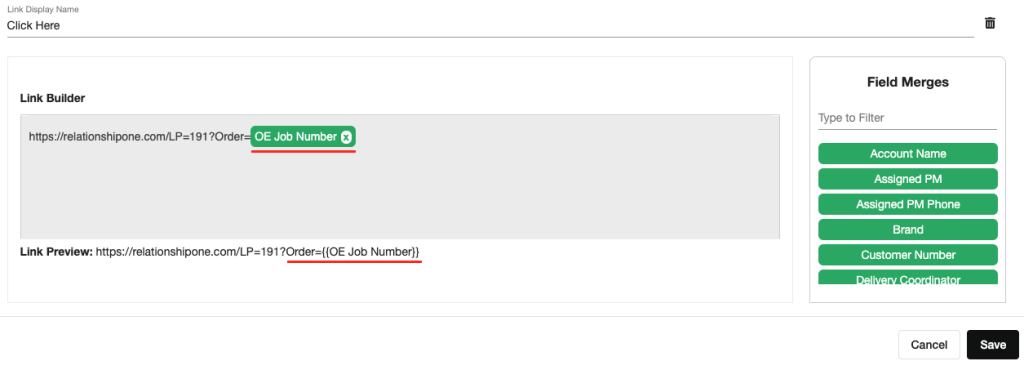
- Fully Dynamic Link: In this example, the full URL is being sent via the JSON code and will be added to your email as-is without any additional text.
- Note: The “Link Display Name” is the text that will show up in your email editor when you place this link within the Cloud Content in your email.
- Note: The “Link Display Name” is the text that will show up in your email editor when you place this link within the Cloud Content in your email.
- Partially Dynamic Link: This example gives you the ability to add a base URL and then use parameters from the JSON code to create the final link. Essentially, this works similarly to using Field Merges within Eloqua URLs. Typically this type of link works well when you need to personalize the link, or you require pre-population or hidden fields.
Adding Dynamic Links to Email:
Now that you have the dynamic link created in your Event, you can go to the email you want to configure and click on the cloud content configuration. Once you are in your cloud content, click on the insert URL icon . This will open a window where you can enter the URL.
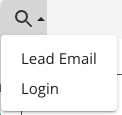
Here, you will select which dynamic CTA you’d like to configure from the dropdown list. These will show the Dynamic Links you created in the Event associated with this email.
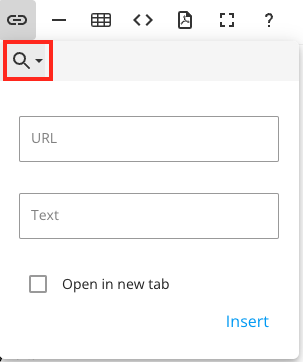
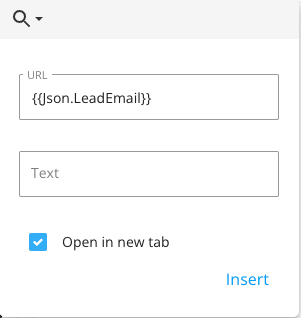
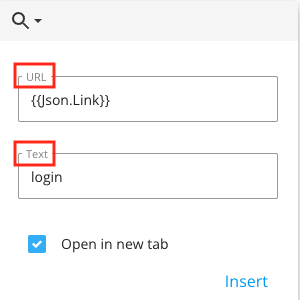
After you select the link, the content will populate the window with the URL and the Text. You can also decide if you want to have your link open in a new window when clicked. Once you have configured your settings for the link, click “Insert”. The link will be inserted into your email.
Note: If you want to mask the URL then leave the text content in the Text field with the proper letter case. If you do not want to mask the URL and want to display the URL JSON value provided (i.e: email links), remove the text copy in the Text field and leave it blank. See the screenshots below for examples.
Formatting the CTA:
Now that you have inserted your link, you may want to start modifying the formatting and styling of your link. To do this you can use the formatting tools in the Transactional Email app to set the type of font family, font size, and color. Once your styling is complete you will need to make sure that your code has the styling within your <a> tag. If the styling for your text is outside of the <a> tag, your styling will be stripped upon sending, even if it looks like it works in the cloud content preview.
To check if your styling is within your <a> tag, you must click this icon to see the HTML code. In the example below, the highlighted yellow area shows the placement of the styling. This is how your code needs to be set up for it to work properly.
Important Note: After you edit the cloud content code, be sure to click on the “icon” again or your changes will not be saved.
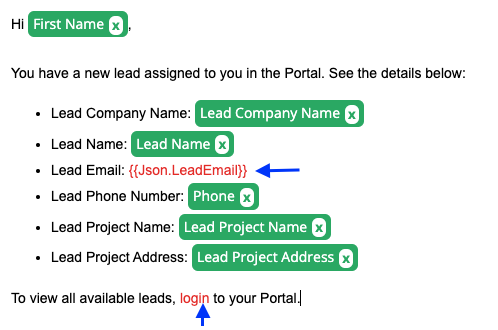
Below, please find a visual example of the Lead Email dynamic link as it appears without a URL mask and the Login link which contains coding for the text mask:
Setting up “email address” types of links
To ensure your URL is actually being treated as an email hyperlink, you must update the code to include the “mailto” designation. Below is an example of how the code should be configured. If you are interested in adding additional code to assign a “Reply to” Subject Line when someone clicks on the email address, you can also use the code below as a reference to set this up.
Important Note: After you edit the cloud content code, make sure to click on the “icon” again or your changes will not be saved.
Creating CTA buttons
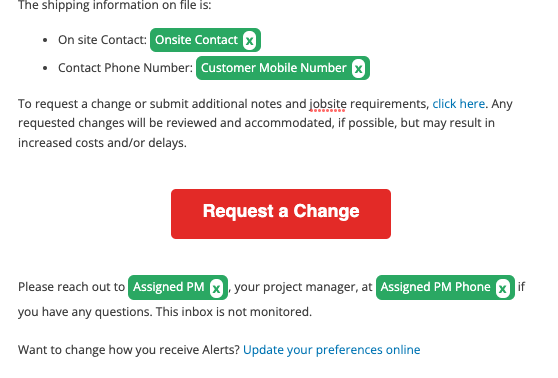
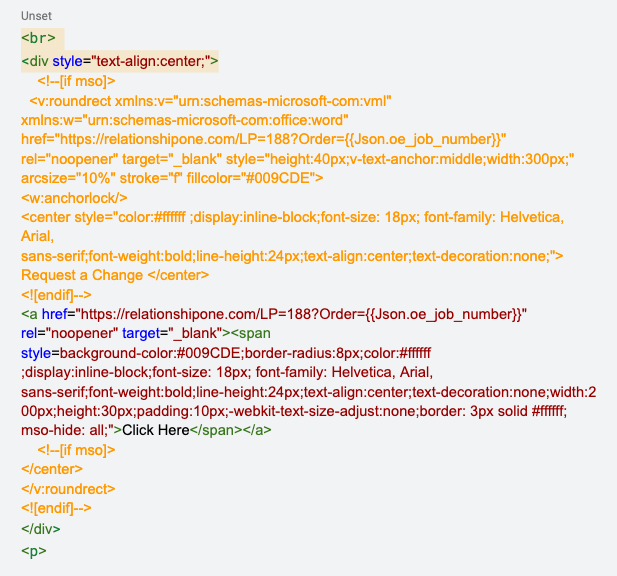
The Relationship One Transactional Email App does not have a pre-built button creation capability as part of the out-of-the-box functionality. However, you can add custom code to build and design the button for your call to action (CTA). This button CTA can also point to a dynamic link.
The sample code below shows you how to set up a “rounded” button CTA with background color and text formatting. This code also ensures that the button is supported in Microsoft Outlook (orange text). Please note that you will need to configure your styling on the Outlook-specific code as well as the code for the button generically. As per the above instructions, you must make sure that all your <span style> tags are in between your <a> tags.
Email “Header” in Cloud Content
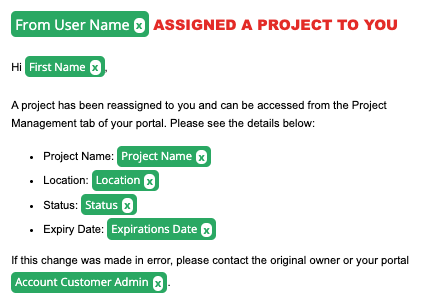
If you need to personalize your header with content sent via the JSON you will need to set up your Header within the Transactional Email app’s cloud content module. Therefore, when adding a personalized header in your cloud content you must make sure that you don’t treat it with <header> tag. Instead, you will be adding the Header within the body of the email since the Transactional Email app lives within an email’s body copy.
To do this, you will build your Header as regular body text but just ensure that your <span style> tag has all your header style formatting. You should try to avoid using separate tags for lines of text as the cloud editor will strip most of them and only use the first <span style> tag.
If you are adding a transactional field merge as part of your Header, you do not need to add additional styling tags to the code. You will want to confirm that the field merge code is within your initial style tag to ensure it is formatted properly.
Note: if your branding requires your Header (title) to be in CAPS you will need to make sure that the data being sent through the JSON is already formatted as CAPS.
Sample Code for a Header:
Creating “Lists” in Cloud Content
If your transactional email requires a list of items to be displayed as bullet points or number lists you can use the following icons . By using the out-of-the-box capabilities, you ensure that the code for these is going to work properly once the email is set to go out.
A few tips:
- Confirm that your <Style tag> is using your desired setup. If not, flip to the code view of the content and update it to match your desired style.
- If you are using transactional fields as merges to your content make sure that the data is within your list styling tag.
- Below is an example of how the code should look to display the content as the image shows:
Sample of Fully Designed Email:
Copying HTML code from one email to another
When creating multiple emails for a transactional program/initiative, and they are similar in format, keep in mind that you can build the email code once and repurpose it in other emails. However, the Transactional Email app fields in the cloud content will need to be removed and replaced with the fields from the new Event. This is because the cloud content that you build your template code from is strictly tied to one event. Additionally, transactional events and emails have a 1:1 relationship, and therefore the field IDs for your field merges are unique to that specific email.
Once you’ve removed the transactional fields, you’ll be able to utilize the rest of your formatted and tested code in your new email content cloud.
How to remove your transactional fields:
- Option 1: Update within the Code
In this example, we have a transactional field for “First Name”. The highlighted code will be what you remove. The bolded text shows the unique ID for the field associated with an Event’s transaction setup. Once this is done for all the fields in the email, make sure to click on again to save your changes, then you can save your cloud content. Once you are in the design editor you will need to re-add the fields to the email. The new fields you are adding are related to the Event that you are configuring.
- Option 2: Update within the Editor
Click on the “x” of the field to remove it.
Once this is done for all the fields in the email you can save your cloud content and then re-add the fields to the email.
The new fields you are adding are related to the Event that you are configuring.
We hope that this post enables you to build nice-looking branded transactional emails. Stay tuned for more Transactional Email app blogs as new enhancements are released to expand the capabilities of transactional email marketing.
Need some help getting started? Relationship One is here to help you design and deploy an end-to-end transactional email program! Contact us today!


