Basics of Oracle Eloqua Responsive Forms
As Eloqua rounds out its new Responsive asset builders, we have the new Responsive Forms Editor. You may have seen our post on the Responsive Email and Responsive Landing page editors. Now we are going to talk about the Responsive Forms Editor.
This new form design editor, like the other responsive editors, is a drag and drop interface that lets you create fully responsive forms without touching that tricky code. You are able to view the form html and copy and paste if needed.
There are 2 types of forms:
- The old “Classic” Form Design editor (will be sunset in early 2020
- The ability to create or copy new Classic forms was sunsetted with the Eloqua 20A release in Feb 2020
- Any forms created using the classic editor will continue to function without any loss of service after the 20A release including capturing submission data and executing processing steps.
- The new “Responsive” Form editor
If you have classic forms that you want to transition to the responsive editor, you can skip down to the “Transitioning your existing forms” section of this article. If not, let’s start building some Responsive Forms!
Create New Responsive Forms
If you have created forms in the Classic editor, the Responsive editor won’t be much different. You will now find what you need in an easier drag and drop user interface. If you are new to creating forms in Eloqua, then let’s get to it and have some fun.
If this is the first time you are creating forms for marketing, I want to let you know that using forms on your landing pages is a primary method for learning more about your existing contacts and gathering information about prospective ones. You can use forms to gather valuable information. You can offer demos, informational documents and other valuable information in exchange for the form submissions. You can also direct visitors to a campaign, program or redirect to a webpage.
When a visitor fills out the form data and submits the information, they may be “opting in” to your marketing campaign. If so, this information should be clearly stated on your form.
So, let’s create a form.
- Navigate to Assets, then Forms
- Click Create a Form to open the Template Chooser window.
- Select “Blank Responsive Form” (if you have Responsive Form Templates created for you, you can select “All Files” to see them and use them as your form or as a base for a new form)
- Using the “Blank Responsive Form”, you will see the following areas:
- Contact Fields
- Form Elements
- Field Groups
- General Style
- Settings
- Main Canvas
- Blank Drag and Drop Canvas
- Start with Naming your form. This is the name you will store in your folder structure in Eloqua. It is important to use good naming conventions so the form can be easily identified in reports, segments and other decisions in Eloqua.
- Double click the text “Untitled Form” and give your form a new name
- Next let’s configure the Settings:
- Click on the gear icon to view the form settings
- Name the form.
- It is important to use good naming conventions so the form can be easily identified in reports, segments and other decisions in Eloqua.
- Enter the Validation Failure page
- This is a landing page to which the submitter is redirected if the form is unavailable, or if the form is not completed properly.
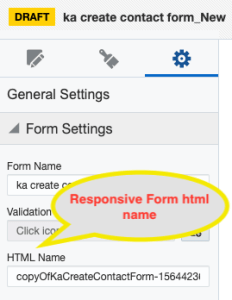
- Enter the HTML name
- This will be a unique name. Eloqua will not allow for duplicate form html names. The name cannot contain any spaces. Eloqua will validate the availability of the name.
- Allow Form Submissions
- Set whether those with the Form URL can input information on your form
- If the option is disabled, the form remains visible but will not accept submissions via the landing page or endpoints (API)
- Disabling the Allow Form Submissions option prevents spam attacks on old or new forms.
- This is useful if the form is old or the current use of the form should be temporarily disabled.
- Next let’s add some form elements
- Contact Fields
- Scroll the list of Contact fields or use the search box to search for the Contact field you would like to add to your form
- Remember that “Email Address” is required on each form.
- Drag the field with your mouse to the Blank form on the right
- After you add the field, the “Contact Field” options are available
- General Properties
- Field Validation
- Field Properties
- Use the back arrow at the top of the “Contact Field” section to go back to adding additional fields
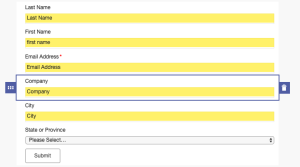
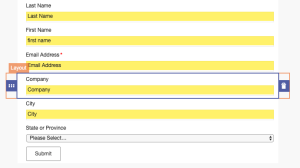
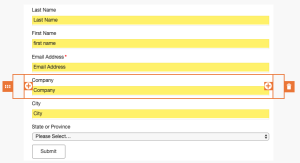
- NOTE: to rearrange the fields on the form canvas
- Click on the field that you would like to move. You will see a purple box around the field
- Move your mouse below the purple grab tab. You will see an orange box around the field.
- Click your mouse and you will see the orange grab tab. Use the orange tab to drag your field
- After you add the field, the “Contact Field” options are available
- Scroll the list of Contact fields or use the search box to search for the Contact field you would like to add to your form
- Form Elements
- Progressive Profile – allows you to drag and drop contact and custom fields into a section that provides control over when and how these fields are presented to your contacts.
- Form Text – Drag onto your form to add general information such as section headers.
- Add additional Custom fields including Hidden fields
- Field Groups
- Group of standard sets of fields
- Basics
- First Name, Last Name and Email Address
- Extended
- Title, First Name, Last Name and Email Address
- Address Field Group
- Address 1, Address 2, City, State or Province, Zip or Postal Code and Country.
- Custom two column
- Custom three column
- Basics
- Once you add the group to the form, the fields are no longer grouped and can be treated separately.
- Group of standard sets of fields
- Contact Fields
- Next, we have General Style
- Label Style
- Use this tab to set you label position and alignment. These options apply to all field labels on the form. These options are available to set when no specific field is selected.
- Label Style
- After you have your fields in place with your settings, we can configure the Processing Steps. Remember to SAVE your work often.
Let’s Configure some Processing Steps
Form Processing Steps allow you to configure what should happen after a contact clicks on the Submit button on your form. Below are some of the common type of actions you can perform using Form Processing Steps.
- Update Contact Data with data from the form submission
- Update a Custom object with data from the form submission
- Update an Account with data from the form submission
- Add form submitter to a shared list based on form submission data
- Send Contact record to another Program or Campaign
- Send the form submitter a submission confirmation email
- Send a form submission notification to a marketer
- Redirect the form submitter to a new page after they have submitted the form
Access the Form Processing Steps:
If you have used Form Processing steps in the Classic form, there is no change in the process. If you are new to using forms in Eloqua, we will go through the process to configure these steps.
When you are viewing your form fields, you will see the “Processing” button in the top right corner next to the Save button. Click on this button to go to the Processing steps page. To toggle back to the form field page, you will see a “Design” button in the top left of the Processing Steps page.
After you have made your way to the Processing Steps page, you will see a + button below the form name that will bring up a list of the available steps.
Before you start adding steps, there are a few things to know.
- You can add the steps in whatever order you want, but Eloqua will reorder the steps that must occur first. You cannot change this.
- Processing steps can be configured to run conditionally based on data submitted in the Form or existing Contact or Custom Object data.
- Multiple conditions will be treated as an AND operator
- Click on the + button and double-click the processing step that you want to add. The step will show in the left column
- To document your step, double-click on the step you added and add a short description.
- Configure the processing step and add any required conditions. You can also add the steps, but keep them disabled until needed by selecting “Never”
- Make sure to verify that the email address field on your form is mapped to the correct contact field. In most cases this will auto-populate, but in some cases it does not. You will find this verification area on the Processing step page in the bottom left of the page.
- Each processing step has specific configuration requirements which you can find detailed information on each one on the Oracle Help site. I will show you a common one here.
- Update Contacts – With Form Data: This step will write form submission data to the Contact table following any conditions you may have set.
- Click on the + icon to open the list of available steps
- Double-click on the processing step to add it to the left column
- Double-click on the step to add the description
- General Settings
- Select the Contact Table Email Address that identifies the contact
- Field Mapping
- Source Field = Form Field
- Target Field = Contact Table field
- All Fields Update Type – use the drop down to choose a default for when you want the field to be updated. Each field can also be set individually when mapped.
- Set to default – uses the configuration found in the contact field settings “Default Update Logic” in the Field & Views area for each field.
- After you have mapped the fields that you want to map, you can set any run conditions if needed.
- Click on the + icon to open the list of available steps
- To Add Run conditions to any processing step
- Update Contacts – With Form Data: This step will write form submission data to the Contact table following any conditions you may have set.
Transition your Existing Forms
Let’s look at the “Save As” method of transitioning your forms and templates. This method brings over most items, but a few things will need to be edited.
Navigate to the form that you would like to transition.
- Click on the File menu in the top left and select “Save As” or “Save As Template”
- Navigate to the folder you would like to save the new Responsive forms
- Enter the name of your new form
- You will notice that the “Type” column in your form listing for your new form will show as “Design” whereas the old forms will show as “Classic”
- We recommend that you do not have duplicate form names as this can cause confusion down the road. We suggest prefacing the old form with an “X” or “Do Not Use”.
- Eloqua will not allow for duplicate form “html” names so your new responsive form will have a new html name. This will work for testing, but if you need to test the new form using the old form html name, you will need to rename your old form html name. You can also give the new form a brand-new html name.
- Once you have all the names set, there are a few things you should check in your new responsive form.
- Most of these items come over just fine but worth giving a quick check.
- Field Name labels
- Field html names
- Pre-populations
- Field validations
- Some of these Form Processing Steps could be missing some configuration. You should check the configurations on all of your steps but these for sure.
- Add to Program
- Confirm the Listener step is configured
- Add to Program Builder
- Confirm the Start step is selected
- Redirect to Web page
- Any steps with Conditional filters
- Any steps that utilize picklists for routing
- Add to Program
- Most of these items come over just fine but worth giving a quick check.
Simple, right? For more information about Oracle Eloqua forms, or for assistance, please contact us!
Thank you for subscribing!


